Known Issues
8/16- Aastra 5xi series phones are configured to send a provisional response, or PRACK, with the 100 rel setting enabled, When calling to or from the OnSIP app or any encrypted audio enabled client, it tells our proxy to send the phone the encryption information, and breaks the call. We are investigating, but at this time we can not find a way to disable the 100 rel setting at the user level. We can not recommend using this model in a setting where the OnSIP app would be calling to or from an Aastra phone.
There is a serious security hole in the web interface for Aastra phones that allows anyone with access to the configuration pages to be able to see the sip credentials, including the SIP Password, in the source code of the web pages.
For this reason, we very strongly urge the following steps be taken to secure the phone:
- Change the administrative password for phone access, The default password is widely know, and makes access to the web interface easy. It's also a best security practice.
- Keep ALL phones behind a NAT device at all times. Ensure that there are no web interfaces accessible at port 80 from your network to the internet.
We have reported this issue to Aastra. Presently there is no timeline for a resolution.
Prerequisites
Aastra now allows public download of documentation and software at:
Aastra and Mitel firmware downloads
Phone network configuration completed.
The following instructions assume your phone has successfully booted and completed network configuration including obtaining valid IP addresses for itself, an IP gateway and DNS servers either via DHCP, manual or other means (refer to your Aastra Administrator's Guide) and that your phone is running with factory defaults.
Phone is running firmware release 2.2.0 or better.
You can find the firmware version your phone is currently running by using the "Options" button on your phone and navigating to "Phone Status" -> "Firmware Info". If you are running a version prior to 2.2.0, please upgrade your phone's software before proceeding (refer to your Aastra Administrator's Guide).
Phone Configuration
Step 1: Gather information for each user.
Each user has a set of credentials which will be needed to configure each phone. For each phone that you are configuring, obtain the following:
- "SIP Address" (Address of Record)
- "SIP Password"
- "Auth Username"
- "Username"
- "Domain"
- "Outbound Proxy"
You can find this information in app.onsip.com under the Administrator tab, Users on the left, click on the User's name the device will be configured to expand the options, then choose the Phone Settings tab.
Step 2: Log into your Aastra phone through a web browser.
When your phone is powered on and connected to your LAN, use a browser to navigate to the IP address of your phone. You locate your phone's IP address by selecting "Options", then scroll to phone status and finally to IP&MAC addresses. The factory default administrative username for the phone is 'admin' and the factory default password is '22222'. Go to Operation and select "Reset" then reset the Factory Defaults and Remove Local Config settings. Then, Select "Line 1".

Step 3. Enter your user information from Step 1.
Basic SIP Authentication Settings Section
- Screen Name > Whatever you would like others to see when you call them.
- Phone Number > "Username"
- Caller ID > Whatever caller ID you would like displayed on outbound calls.
- Authentication Name > "Auth Username"
- Password > "SIP Password"
- Line Mode> Generic
Basic SIP Network Settings Section
- Proxy Server> "Domain"
- Outbound Proxy Server> sip.onsip.com
- Registrar Server> "Domain"
- Registration Period> 600
Click the "Save Settings" button.
Step 4. Confirm that you have disabled all Network Address Translation (NAT) settings.
We handle all NAT related issues. If your phone was set to factory defaults before you began configuration, your NAT section will appear as below:
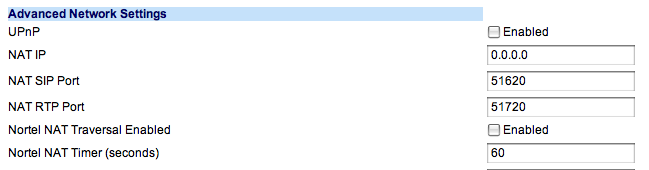
Note: Version 3.2.2.56 - You MUST assign each phone a static internal IP address and then set the NAT IP address to that IP address and set the NAT SIP Port to 5060 and the NAT RTP port to 3000.
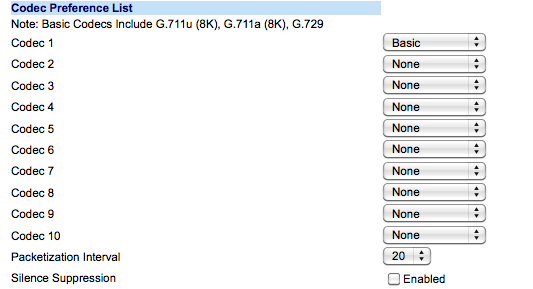
Step 5. Disable unnecessary codecs.
Navigate to RTP Settings under Global SIP Settings. For "Codec 1" choose "Basic" from the drop down Codecs box. Lease the rest as "none." This is all that is necessary for compatibility with OnSIP and sending extra codecs can cause problems with packet size.
Previous to version 2.5
Navigate to RTP Settings under Global SIP Settings and check the "Basic Codecs" box. This is all that is necessary for compatibility with OnSIP and sending extra codecs can cause problems with packet size.
Step 6. Confirm that your phone is registered.
In app.onsip.com as Admin, click on the Users tab. You will see an "online" notation next to each user with a registered device.
Troubleshooting
If you are experiencing trouble, double-check your settings as described above and be sure to verify that your password was entered correctly without any leading or trailing spaces. If you are still having problems with your phone configuration, please see our troubleshooting section for further help.
See our top business VoIP phone recommendations for 2017

Comments