Step 1: Gather information for each user.
Each user has a set of credentials which will be needed to configure each phone. For each phone that you are configuring, obtain the following:
- SIP Address (Address of Record)
- SIP Password
- Auth Username
- Username
- Proxy/Domain
You can find this information in app.onsip.com under the Administrator tab, Users on the left, click on the User's name the device will be configured to expand the options, then choose the Phone Settings tab.

Step 2: Log into your Cyberdata Speaker through a web browser
When your speaker is powered on and connected to your LAN, use a browser to navigate to the IP address of your speaker. The default setup for Cyberdata devices is DHCP, so you will need to check your DHCP pool's bindings for the serial number of the device. The serial number is located on on the back of the device.
You will need to log into the device using the login of "admin" and password of "admin." From here, click on SIP CONFIG.
Step 3. Enter your user information from Step 1.
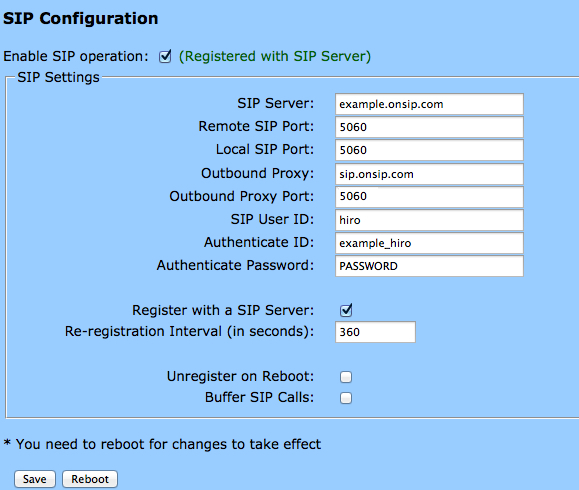
- SIP Server: Domain
- Local SIP Port: 5060
- Remote SIP Port: 5060
- Outbound Proxy: sip.onsip.com
- Outbound Proxy Port: 5060
- SIP User ID: Username
- Authenticate ID: Auth Username
- Authenticate Password: SIP Password
You will need to click Save and then Reboot.
Please note that your password information will not be masked after you have entered it into the device.
NOTE: If the device is showing as "NAT Not Found" in the OnSIP portal, it may be an issue with the R-port. In the SIP tab, enable the setting "Disable R-Port Discovery". When this setting is enabled (Yes enabling a disable setting... quite the misnomer) the unit will register correctly. Save your settings and reboot.
Step 4. Confirm that your device is registered.
In app.onsip.com as Admin, click on the Users tab. You will see an "online" notation next to each user with a registered device.
Comments