Updated May 2015
Prerequisites
Snom allows public download of documentation and software at: http://wiki.snom.com- Phone network configuration completed. The following instructions assume your phone has successfully booted and completed network configuration including obtaining valid IP addresses for itself, an IP gateway and DNS servers either via DHCP, manual or other means (refer to your phone's documentation) and that your phone is running with factory defaults.
- Phone is running firmware release 7.3.30 or better. You can find the firmware version your phone is currently running by using the"Help" (?) button on your phone and choosing the "Version" option. If you are running a version prior to 7.3.30, please upgrade your phone's software before proceeding (refer tohttp://wiki.snom.com).
Step 1: Gather information for each user.
Each user has a set of credentials which will be needed to configure each phone. For each phone that you are configuring, obtain the following:- SIP Address (Address of Record)
- SIP Password
- Auth Username
- Username
- Proxy/Domain
Step 2: Log into your SNOM phone through a web browser
When you plug in the Snom phones the phone its IP address is displayed on the screen. When your phone is powered on and connected to your LAN, use a browser to navigate to the IP address of your phone and select"Identity 1". To display the IP address of your Snom phone, select the "Help" (?) button then select "IPAdr".Step 3. Enter your user information from Step 1.
For most setups, you will need to simply configure "Identity 1". If you are trying to configure multiple users or multiple line appearances, you can repeat the steps below for each of the identities you are configuring.- Display Name > Whatever you would like.
- Account > Username
- Password > SIP Password
- Registrar > Domain
- Outbound Proxy > sip.onsip.com
- Authentication Username > Auth Username
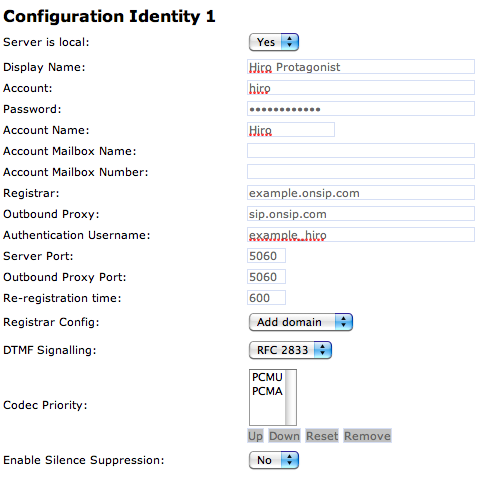 Click "SAVE" and then 'Re-register".
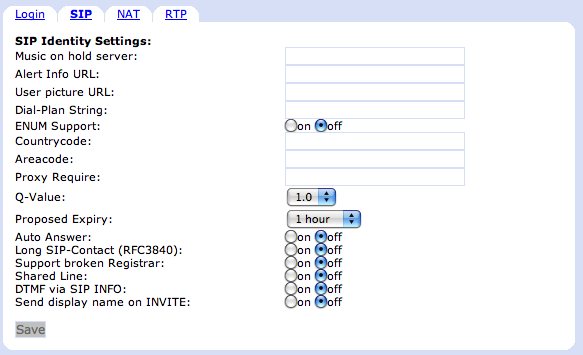
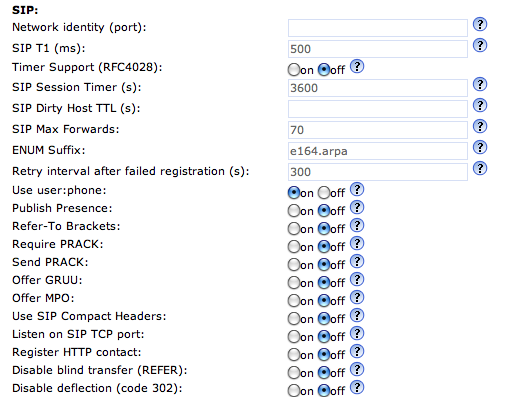
Step 4. Confirm that you have disabled all SIP settings.
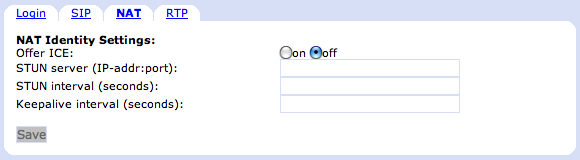
Step 5. Confirm that you have disabled all Network Address Translation (NAT) settings.
We handle all NAT related issues. So, make sure to turn off any NAT settings in order for your phone to communicate properly with our servers.- Select the "NAT" tab.
- Make sure "Offer ICE" is off and all other fields are blank.
- Click "Save" if you made any changes.
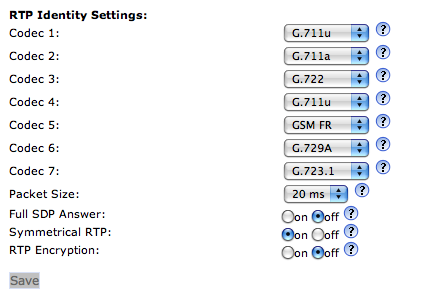
Step 6. Disable RTP encryption and Tune Codec List.
By default, SNOM phones ship with RTP encryption enabled. This must be disabled in order for your phone to communicate properly with our servers.- Select the "RTP" tab.
- Change "Full SDP Answer" to OFF.
- Change "Symmetrical RTP" to ON.
- Change "RTP Encryption" to OFF.
- Change codecs as displayed below (codecs 4-7 should be set to G.711u).
- Click "Save".
Step 7: Advanced Settings
- Click "Advanced" on the main menu.
- Click the SIP/RTP tab.
- Change "Require PRACK" to OFF
- Change "Publish Presence" to OFF
- Click "Save".
Step 8. Confirm that your phone is registered.
In the User portal, click on the "Users" tab. You will see a green "online" notation next to each user with a registered phone.
Snom 320 Review
The Snom 320 (firmware 320 v7.3.30) is a 2-year old SIP business phone, and the middle tier in the company’s 300 series. It has more features than the Snom 300 including additional line displays and a better semi-graphic LCD, but at a considerable price increase. The Snom 360 and 370 are even pricier still and have larger LCD screens, as well as another suite of features that are not included in the 320.
The 320 comes with a built-in full duplex speakerphone, dual Ethernet connection, the power over Ethernet feature, and three-party conference bridging. Other functions you might expect in a SIP business phone such as auto-answer, do-not-disturb mode, directories, transfer, hold, and call blocking are included as well.
This device also comes with 12 line appearances, which is more than most business phones found in this price bracket. It is pretty clear that the 320 was designed to be used as an office phone or by someone who spends a lot of time on the line.
First Impressions
The first thing you’ll notice about the 320 is that it has a lot of buttons. Huge buttons, tiny buttons, and buttons that don’t have any discernible purpose when you first get the phone. The monochrome 2 by 24 character LCD screen is small, and though other sources say it's backlit, the LCD we have on the 320 in our office is clearly not.
The phone itself has a little bit of a retro look, with clean, 90-degree angles at each edge. It comes in an appealing graphite / dark blue coloring.
The handset feels substantial in your hand. Actually, it's surprisingly heavy, which I don't mind at all. It's much better than getting a phone with components that feel hollow and cheap.
Phone Configuration
The phone does not take any time to reboot when settings are saved, and we are very grateful for that. However, when you do register or re-register your 320, your LCD display screen might ask you to enter in a password. Simply click the “X” button and you should find that your phone is perfectly installed and successfully registered to your network.
OnSIP Testing
At OnSIP, we put each of the phones we use through a multi-step interoperability test in which we put the phones through 30 test cases. An example of a test case would be the following:
Test phone calls phone B B picks up Test phone puts B on hold B puts test phone on hold Test phone retrieves B B retrieves Test phone
While being on hold, there must not be audio between the parties. After the parties have retrieved each other, there must be audio both ways.
The Snom 320 passed our interoperability test with no issues.
Voice Quality
The voice quality of the handset has markedly improved since Snom upgraded the firmware and added support for G.722. Do note that there is still a clear difference between 'high definition capable phones', phones designed for superior audio quality, and 'high definition compatible' phones, phones that are getting the wideband codec via a software upgrade to remain competitive. Obviously, the Snom 320 is in the latter category. The voice quality is still much better than what you would get on an analog telephone, but not quite comparable to Polycom's patented 'HD voice'.
Speakerphone
We did not particularly enjoy using the speakerphone. We might be spoiled by the sound quality on the Polycom speakerphones we have in our office, but we found that using the feature on the 320 was unsatisfying. Having a full duplex speakerphone on a phone in this price range also isn’t as impressive as it used to be. Plenty of entry level desk phones now have speakerphones, and they do it better.
Ease of Use
Overall, the Snom 320 is very easy to use. There are dedicated buttons for most of the features on the phone so you can access what you want quickly and easily. Most of the dedicated keys are unusually small, but we would imagine users would have no problem getting used to it. Having 12 programmable keys that can be used to gain quick access to important numbers and extensions can also be very convenient.
Here at Junction, we’re pretty much suckers for anything with a big LCD display so we weren’t completely thrilled with the 2 by 24 character monochrome display on the 320. Having a display this size means that users will have to do a lot of scrolling and searching the first few times they need to adjust settings, but like the small buttons, its really not an issue once you get used to it. If you're sticking with this manufacturer, want a bigger display, more features and can shell out the extra 50 bucks, we would recommend going for the Snom 360 or 370.
See our top business VoIP phone recommendations for 2017

Comments