Device Configuration
Step 1: Gather information for each user
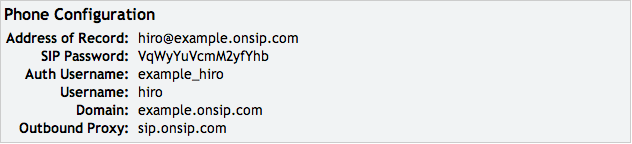
Each user has a set of credentials which will be needed to configure each device. For each device that you are configuring, obtain the following:
- "SIP Address" (Address of Record)
- "SIP Password"
- "Auth Username"
- "Username"
- "Domain"
- "Outbound Proxy"
You can find this information in the "User" tab, click on User's name the device will be configured to expand boxes, "Phone Configuration" box:
**IMPORTANT**
In the OnSIP admin portal, edit the SIP address of the user so that the SIP address (Username) is the same as the Auth Username. In the above example you would want the username to be example_hiro as well as the Auth Username.
Step 2: Log into your device through a web browser
Step 3: Enter your user information from Step 1
Softphones/{choose the phone}
- Name > Pre-setup name
- User Name > "Username" (make same as auth username - see note above)
- CID Name > Whatever you would like displayed
- Proxy > "Domain"
- Backup Proxy > sip.onsip.com
- Transport > UDP
- Register With Proxy > Yes
- Authentication ID > "Auth Username"
- Password > "SIP Password"
- Domain > "Domain"
- Registration Timeout > 3600
- SIP Port > 5060
- Enable DTMF INFO > No
- RFC2833 > 101
- Enable Logging > No
- Enable STUN > No
- Enable SRTP > No
- Select the following Codecs only: G722, G711 ulaw, G711 alaw

Click the "ok" button at bottom of page.
**Quirks**
1.) Type in the password, do not cut/paste.
2.) Make sure the username is the same as the auth username in the OnSIP Admin portal
3.) You have to reboot the device for the settings to take
Step 4: Confirm that your device is registered.
In the Admin Portal, click on the "Users" tab. You will see a green "online" notation next to each user with a registered device.
Added July 2015
See our top business VoIP phone recommendations

Comments