Note: The OnSIP Yealink Boot Server serves the latest tested and verified firmware version and user settings for the following models.
Yealink models: CP860, CP920, CP960 SIP-T19P/E2, SIP-T20P, SIP-T21P/E2, SIP-T22P, SIP-T23P, SIP-T26P, SIP-T28P, SIP-T27G/P, SIP-T29G, SIP-T30G / T30P, SIP-T31G / T31P, SIP-T32G, SIP-T33G / T33P, SIP-T38G, SIP-T40S/G, SIP-T41S/P, SIP-T42S/G/U, SIP-T43U,SIP-T46S/G/U, SIP-T48G / T48S / T48U / T48 Pro, SIP VP-T49G, T34W,T-52S, T54S, T56A, SIP-T58V / T58A, T53W, T54W, T57W, SIP-T73U / T73W, SIP-T74U / T74W, SIP-T77U, SIP-T87W, VP-2009P, VP530, W-52P, W-56P, W-60B, W-60P, W-70
Important Notes
- You should not use the boot server if you have multiple VoIP providers configured on your phone, as it provides a minimal configuration for OnSIP service that may cause problems for your other providers.
- For security purposes, do NOT put phones on static IP addresses directly on the Internet. If there is no other option, you must at least disable port 80 (WWW) inbound to any phone device. If this precaution is not taken, OnSIP is not liable for any charges you may incur due to access to the phones.
- All Yealink phones that reboot on our boot server are given a new web admin password. To view the password for a phone, log in to app.onsip.com as Admin and go to the Administrators tab, select Phones and under Phone Info the phone password will be listed.
Step 1: Reset your phone to its factory defaults
Get the IP address of your phone. You should be able to find this on your phone's on-screen menus under "Status". On VP-2009Ps, you can get the IP address by tapping on the icon of the two computers in the upper right-hand corner of your screen. On the Yealink SIP-T46G, you can find the IP address of the phone by pressing the "OK" button.
Enter the IP address into your web browser to access the phone's web configuration tool. If this is your first time accessing the web config tool, the default login and password is admin/admin. It's highly recommended that you change your phone's login and password.
You should see an "Upgrade" tab on your screen (For the T38G, the "Upgrade" tab is under "Phone"). Click on it and select the option "Reset to Factory".
If the web interface is not accepting the admin/admin combination to reset the phone to defaults, then hold down the OK key on the phone for 10 seconds. The display will ask if you want to reset. Press "yes", and it will be factory defaulted.
Step 2: Find the Mac Address of your phone and enter it into the OnSIP Admin Portal
You can find your phone's Mac Address printed underneath it. Enter it into the OnSIP Admin Portal.
Step 3: Add http://boot.onsip.com/ to your Yealink phone
Go back into your phone's web config tool by typing in its IP address into your web browser. Hopefully, by now you've changed the login and password. There are a few minor differences between each model, but the overall gist of the process is the same.
For the SIP-T22
Click the "Settings" tab on top, then "Auto Provision" on the left-hand panel. Enter http://boot.onsip.com/ into the field labeled "Server URL". The ending "/" is VERY important. The phone will NOT register without it.
Finally, click on "Autoprovision Now" button. The provisioning process will take your phone a few minutes. At first, it will load with the wrong time and 'No service'. There's no reason to panic- your phone will go through another series of configuration and initialization screens before it gets all the settings right. When it's registered it will show the Username.

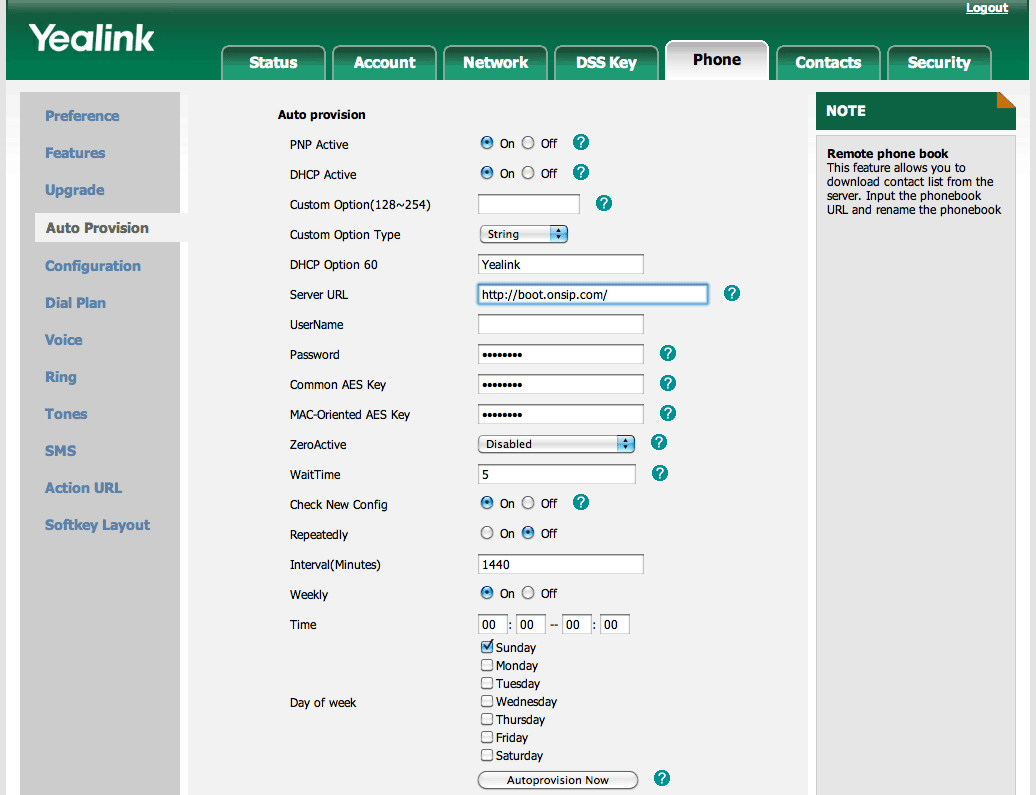
For the SIP-T38G
Click "Phone", then "Auto Provision" from the sidebar menu. Enter http://boot.onsip.com/ into the field labeled "Server URL". The ending / is important. Where it says "Check New Config", select "On". Finally, hit the button labeled "Auto Provision".
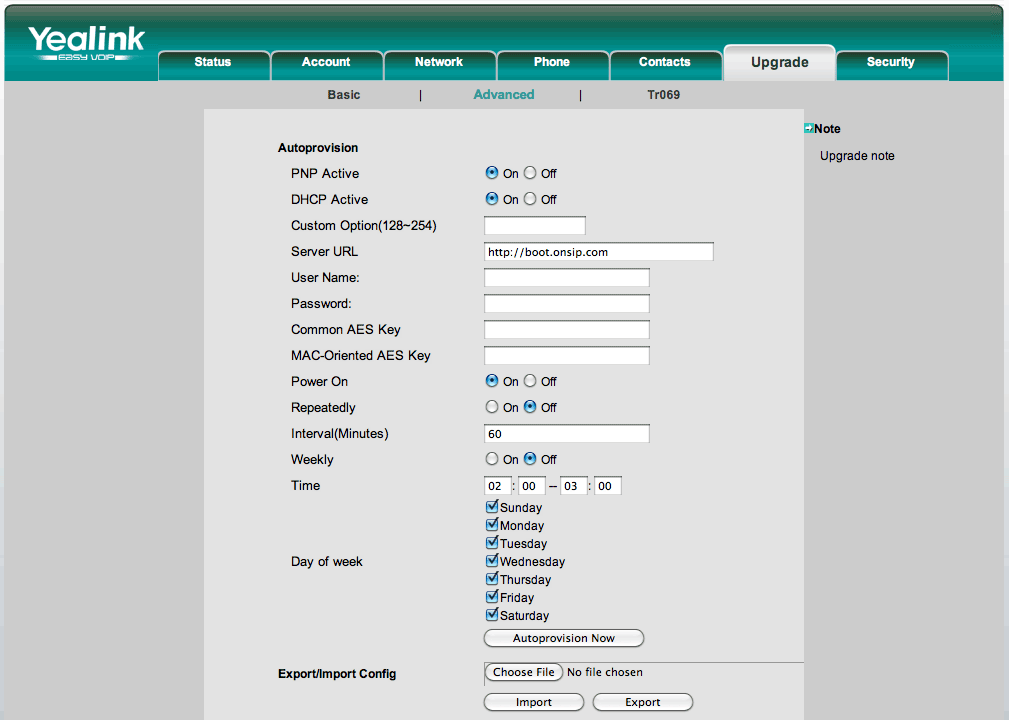
For the VP-2009P
Click "Upgrade", then "Advanced". Enter http://boot.onsip.com/ into the field labeled "Server URL". The ending / is important. Where it says "Power on", select "On". Finally, hit the button labeled "Auto Provision".
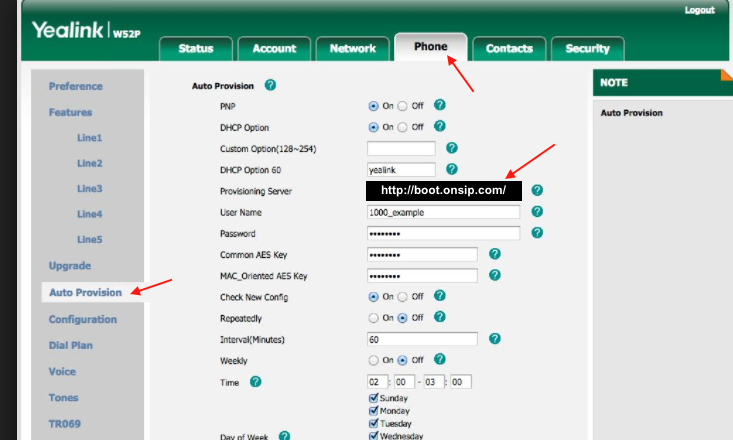
For the W52P / W56P / W60P -
Click "Phone", then "Auto Provision" from the sidebar menu. Enter http://boot.onsip.com/ into the field labeled "Server URL". The ending / is important. Save all changes and restart the phone to pick up the changes.
For W60P - Click "Setting", then "Auto Provision" from the sidebar menu. Enter http://boot.onsip.com/ into the field labeled "Server URL". The ending / is important. Save all changes and restart the phone to pick up the changes.
NOTE - as of August 2018
- P vs H: P = Base unit, H = Handset
- W56P is discontinued (August 2018) and its recommended replacement is W60P
- W56H is still in production and will work with the W60P
- W52P & H are still in production
Updated August 2018
See our top business VoIP phone recommendations

Comments