The OnSIP Boot Server serves the latest tested and verified firmware version and user settings for the following models.
Supported Polycom models: Soundpoint IP 321, 331, 450, 550, 560, 650, 670, VVX101, VVX150, VVX201, VVX250, VVX300, VVX301, VVX310, VVX311, VVX350, VVX400, VVX401, VVX410, VVX411, VVX450, VVX500, VVX501, VVX600, VVX601, Soundstation 6000, Trio 8300, Trio 8500, Trio 8800, CCX 400, CCX 500, CCX 600, CCX 700, Edge E 100, Edge E 220, Edge E 300 / 320 / 350, Edge E 400 / 450, Edge E 400 / 450, Edge E 500 / 550
NOTE- The following models will no longer be able to be provisioned by the OnSIP boot server- Soundpoint IP 301, 320, 330, 335, 430, 501, 601, Soundstation 4000, 5000 and 7000. These models have been discontinued and End-of-Lifed by Poly since 2019. They can still be used with OnSIP, but any configuration changes must be done manually.
For Customers that have Polycom Soundpoint 335 phones, these can be provisioned on our boot server as Polycom Soundpoint 331.
OBi versions will not work with OnSIP- they must have the UC/OpenSIP version of Polycom firmware.
Important Notes
- For security purposes, do not put phones on public static IP addresses. If there is no other option, you must at least disable the web portal on any phone device. If this precaution is not taken, OnSIP is not liable for any charges you may incur due to access to the phones.
- All Polycom phones that reboot on our boot server are given a new web admin password. To view the password for a phone, log in to app.onsip.com as Admin and go to the Administrators tab, select Phones and under Phone Info the phone password will be listed.
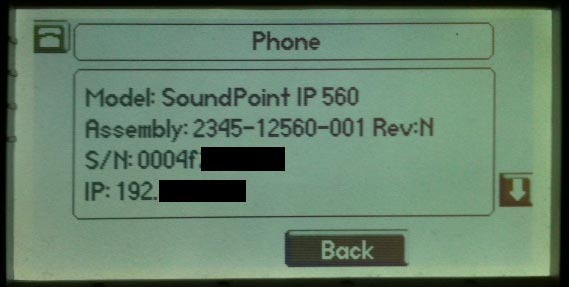
Step 1: Locate the MAC address of your Polycom phone
The "S/N:" field is your MAC address. It should start with "0004f2" or "641xxxxx" and be a total of 12 digits. On the same screen, please note your Model as well. In many cases, this information can also be found on the bottom of the phone albeit printed very small.
On Soundpoint IP and SoundStation model press: Menu ->Status ->Platform ->Phone
On a VVX-model the options are: House icon ->Settings ->Status ->Platform ->Phone
Step 2: Add the MAC Address of your phone in the OnSIP App Administration section
Depending on the type of phone you have, you will need to follow slightly different procedures for each type: New, Used or existing.
Brand new phone
- Add MAC address of phone to OnSIP App Administration section under "Phones" and assign a user
- Add boot server info to phone (see below)
- Reboot phone
Existing OnSIP Phone - New user
- Reassign Phone to new user from dropdown.
- Reset key in the Factory Reset box
- Reboot phone to pick up changes
Used Phone (from another provider)
- Reset Device Config (See here.)
- Reboot phone
- Reset Local Config (See here.)
- Reboot phone
- Reset Web Configuration (See here.)
- Reboot phone (The phone is now in the same state as a Brand New Phone.)
- Add MAC address of the phone to OnSIP App Administration section under Phones (see here.)
- Add boot server info to phone (see below)
- Reboot phone
Expansion Module - EM50
- Can only be used with the Polycom VVX450
- The hard limit imposed by Polycom of 50 BLF lines = Line 1 is User, next 49 can be configured as BLF
- LINES will be listed first then BLF
- Polycom imposed an inability to skip lines. Physically possible to configure in Phones, but Polycom adjusts and moves all skipped places up on phone screen
Step 3: Add boot.onsip.com to the Polycom phone
For Polycom 5xx, 6xx and VVX
Press the menu button or House Icon on your Polycom phone. Then choose "Settings" (3), and "Advanced" (2). Enter your password; the default password is '456'. Hit the "Enter" soft key when done.
Next, select "Admin Settings" (1), followed by "Network Configuration" (1).
Select Provisioning Server. Change "Server Type" to "HTTPS", and the "Server Address" to boot.onsip.com, using the * key for the periods.
Select "Back"/"Exit" (or use the Left directional key) and the "Save Config" option. The reboot process may take up to 45+ minutes on older phones if a firmware upgrade is required.
The current version of the software for most SoundPoint IP phones on the boot server is 4.0.12. For VVX phones, it is 5.8.0
For Polycom Soundpoint IP 3xx
Press "Menu" on your Polycom phone. Then choose "Settings", and "Advanced". Enter your password; the default password is '456'. Hit the "Enter" soft key when done.
Next, select "Admin Settings", followed by "Network Configuration".
Scroll down using the arrow hard keys until you see "Server Menu". Select it using the checkmark hard key on your phone.

In the "Server Menu", change "Server Type" to HTTPS by using the arrow hard keys and Server Address to boot.onsip.com (Hit the number 2 twice for the letter "b", for example, and the * key for periods. If you see "22" instead of "b" you are in Number mode and must press the "#" key to change to URL mode.) When done, hit the checkmark hard key to save.
Finally, press the left arrow twice until you see "Save Configuration and Reboot". The reboot process may take upwards of 30-minutes on older phones if a firmware upgrade is required.
Step 4: Generate Key
Did the phone reboot, but still doesn't work? If so, log into the OnSIP Admin portal and choose "Phones". Find your phone and choose "Generate Key" and then reboot the phone (Do not factory default the phone).
If there are warning on the phone, to clear the warning on the phone, choose the "Home" button and then "Settings", "Status", "Diagnostics" and then "Warnings". Clear the warnings.
NOTES:
You should not use the boot server if you have multiple VoIP providers configured on your phone, as it provides a minimal configuration for OnSIP service that may cause problems for your other providers.
As of July of 2015, the new VVX boot ROM 5.4.0/5.5.0/5.5.1 requires https:// to access the web interface of the phone when the interface is enabled. We strongly recommend keeping the web interface disabled to prevent security issues as described above.
Comments